Quantcast
Channel: Mixed Media –

40 – January 2, 2016

$
0
0

Today was all about getting set and started on my 40 days of intention.

image

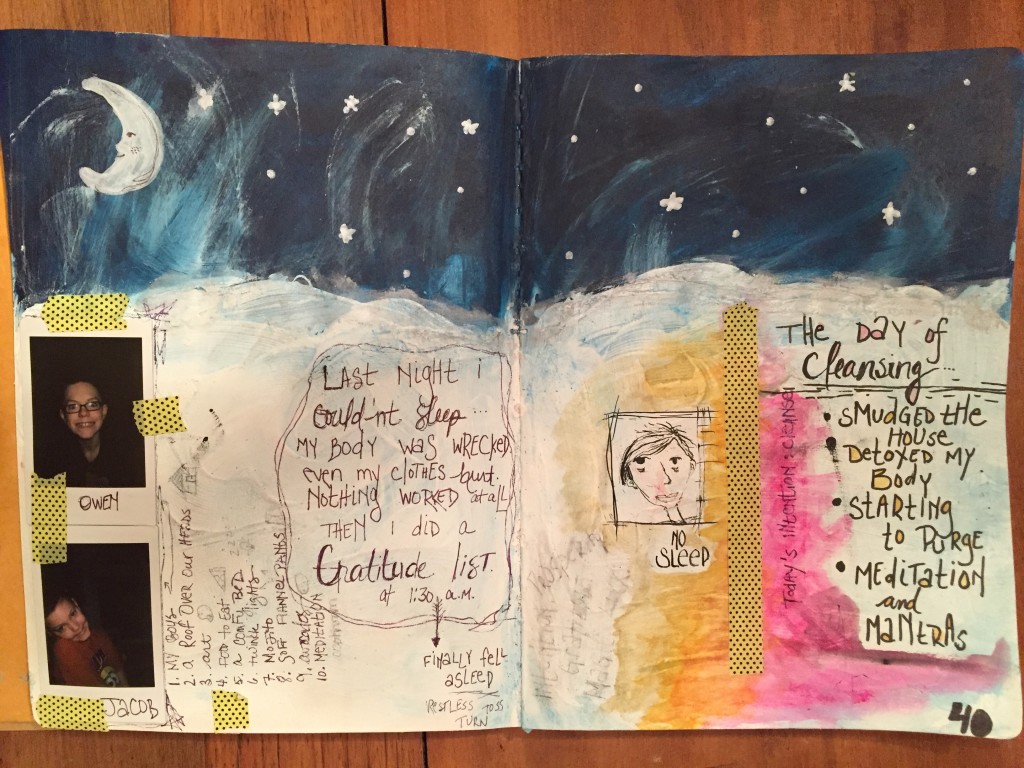
I decided to do a day of cleansing and purging to help start the year and this process of intention off with a clean slate.

So, I cleansed.  Everything.

  • I cleaned the house.
  • I smudged the house.  This was a new endeavor for me.  I have never done this before.  It was intense and wonderful.  Matt had taken the kids out for the morning, so I was able to full commit to a walking meditation while smudging the house.  It was a very comforting and spiritual feeling.  I felt lighter and like the house was somehow more blessed and free…  it was great.
  • Then I did a cleansing bath: Epsom salt, lavender essential oil, joy essential oil, and baking soda.  Hot water, soaking and listening to music, relaxing and detoxing myself.  It was wonderful.
  • Then I began to purge some of the “stuff” in our house, pairing down what was going back after the holiday decorations and starting to create my purge pile for this year.  We will be doing a lot of this throughout the year.  I want to let go of the “stuff” but keep the memories.  They are not mutually exclusive.

Now, I got to thinking about some other ways that I could cleanse the house and myself, that maybe would be additional ways to help clear out and reset the slate.

  • Neti Pot it up…  clean out the sinuses!
  • Detox tea – which I will be drinking later.  A great way to just continue to get the toxins out.
  • Steam clean the carpets – too much work for me today, but maybe I will get Matt on that!
  • Facial mask/facial – clear out the skin.
  • Burning ritual – write out things that you want to let go of – feelings, relationships, junk that’s stuck…  then burn it (carefully!).  A great way to let go of bottled up bits you need to move on.

There are so many more, but these are just a few that I particularly like.

Today that meditation and cleansing was a focus of my mind – I truly gave myself over to that task, fully engaging in every aspect of it.  I felt completely refreshed, rejuvenated, and ready to start a new journey in my life.

Now that the slate is clean and I am ready to be more attentive and intentional, I am off to play Monopoly with my boys – no tv, no phone – just music, family, and laughter.

The first day of my 40 day journey has set the pace for the rest of this journey and I am so excited to see where this goes!


day 20 something… (I think)

$
0
0

Intention is an awesome thing.  Then life kicks in, you get sick, and you lose a week on the couch and in a pile of Kleenex.

art journal, art journaling, mixed media, paint, paper, doodle, doodling, drawing, journal, journaling, diary

Here’s where I am on my 40 days of intentional living and what I have learned so far:

  • I hug a little longer.
  • I laugh a little more.
  • I also cry a little more because I feel everything a little more.
  • I am making strides to address my fibro in new ways with a new doc and being intentional on treatment follow-ups, etc…
  • I put my phone down and engage a little more.
  • I try to speak a little less and listen a little more.
  • No matter what YOUR intention is, LIFE has other ideas – ie days of the crud invading my body…
  • I am flawed in lots and lots and lots of ways, but I am also making positive steps to change some of those flaws.
  • I don’t have time for drama – I am a no drama mama, as I tell the boys.  I’m too old for that high school crap.  And, my cup is empty – I have no more F*&%$ left to give.
  • I am braver than I knew.
  • I am stronger than I knew.

It isn’t much, I know, but it is a start…

I hope that your first month of 2016 has been good and that you remember to be true to yourself, your heart, your art, and your vision.

big news!

$
0
0

bignews

I have written about this more times than I care to.

I have been writing it in my head, in my art journals, and on my computer over and over.

Each time the story changes slightly… each time I was in a different stage of dealing with a 2 year lock down. (Don’t know the story – that’s okay.  I used to work at Fiskars.)

Each time I was feeling sorry for myself.  Each time I was not taking action.  Each time I was blaming and shaming at some level.

Two years came and went.  October 2nd will be forever known as liberation day at my house and it was over and done with before I knew it.

Life went on.

It keeps moving on.

I had planned to tell the full tale of how things came to be… then I realized I didn’t need to and didn’t want to.  Things happened.

Life happened.

And now that it is all over and done with without any real fanfare or earth-shattering issues, I am moving on.

Quickly and excitedly, I am moving on.

It is funny how things change, evolve, and adjust in life.  How loyalty that only runs one way can upset the apple cart so profoundly, yet quietly.  You find yourself in a position of making an announcement that you never dreamed of just 2 years ago… and yet you are beyond thrilled to be making it.

Today I am announcing a HUGE change in my crafting professional life.

Just days after my October 2nd release date, I was in contact with a colleague in the UK and by Friday of this past week, he and I, along with another colleague from California were on the phone and I was on a brand new path.

I am back in the craft world, officially.

I will be working, starting immediately, part-time as an Engagement Marketer for the US market for Tonic Studios.

I am blessed, happy, and ready to get started.

The Tonic team has been soooo amazing to work with these last few weeks and I could not be more ready to jump in and help them grow their market share and their brand recognition in the US.

I will be helping them with social media engagement, product launches, and so much more…

I am going to be creating, playing, sharing, blogging, and curating projects, ideas, tips, and tricks for several of their products here in the US.

I cannot wait to get started and I hope that you will come along on this adventure with me!!

tonic, tonic usa, tonic studios, tonic scissors, crafting, craft tools

big, huge, amazing, exciting news…

$
0
0

There is no beating around the bush right now…  I am just too excited!

On April 9th and 10th I will be teaching a 4 course session on mixed media for CreativeLive!!!!!!

Capture

I cannot even begin to explain how nervous and excited I am about this opportunity!

And here is the coolest part – I will have a few people live in the audience, making along with me!

If you are at all interested in being in the San Francisco audience, you can check out the info ***HERE***!

Class registration for the live streaming event will be coming soon and I will share that as soon as I can.

Now, I am off to pinch myself and finish prepping the materials for the class!


you can now register for my 4 creativelive classes!

$
0
0

They are up, live, and now even have the pics of the final projects on them!

This is seriously a dream come true and I hope that some of you will log in for the live event, even for just a little bit!  I would love to know friendly faces are out in the audience!

The 2 day session streams live for free or you can individually purchase each class.  I am doing 4 projects all that are mixed media…

Here is the link to my first class and an image of what we will be making:

https://www.creativelive.com/courses/introduction-mixed-media-stephenie-hamen

creative live class 1

You can find info on the other three classes there, plus I will continue to share info here!

7 signs of spring – #thursdiy

$
0
0

Well spring has sprung and you can tell by the types of projects we have this week!

#thursdiy 7 projects for spring!!!

First up is a video I did for favecrafts, creating fun party poppers using toilet paper tubes and Hazel & Ruby DIY Decor Tape!

Next up is a tutorial from Margot Potter that helps you identify what you need to get started in metal stamping.

Next up, Cathie and Steve show us how to make Easter ready crackled eggs!

Mark Montano shares a DIY on how to create bright and festive Mexican tin folk art!

Margot then shares the cutest bunch of Peeps this side of the Mississippi, destined to add a touch of fun to your Easter table this year!

Cathy Attix of Trinkets in Bloom shares an adorable flowered Easter basket project with us!

And finally, I am sharing information about my upcoming class with CreativeLive in early April!

I hope you are feeling as ready for spring as we are here today and that we have your weekend crafty juices ready to rock!


a little blog hop action today (and a giveaway…)

$
0
0

I have been blessed to be able to not only be friends with the fabulous Ken Oliver, but I also have gotten to work with him and help him launch his new products.

This week we are partnering up with The Stencil Girl for a little blog hop action to help spread the love of Ken’s Color Burst products and The Stencil Girl stencils.

This is the project I put together… I hope you like it.

Oh, and  be sure to leave a comment – I have 6 prize packs of products to give away…  SIX!!!!!  I will pick the winners on Sunday, 3/29/15 at noon CST.

So this might seem like a lot steps, but really it is just adding different layers of color – the technique for mixing and applying is always the same.  The layers are the thing…

Here are the supplies you will need:

1

How to put it all together:

1.  Put white gesso onto your mixing surface, add in your first color burst color.  Mix until color is evenly distributed and the shade that you want.

2

2.  Using your first stencil, add your gesso to the canvas.  Pick it up and move it several times for added thickness and textures.  Don’t be afraid to experiment.

3

4

3.  Let this layer dry.

5

4.  This time mix your color into clear gesso.  This will give you a translucent result rather than an opaque result which is what you get from the white gesso.  You can even mix colors to create a custom shade!

6

5.  Let this layer dry as well.

6.  Do another color and layer…  I chose yellow.

7

8

7.  Dry.

15

8.  Mix a contracting color and then dab it on using a wine cork.  Simple, but it adds a different shape and texture to the piece.

9

10


9.  Dry.

10.  Add gesso straight to the board now.  Then sprinkle in a color and swirl it until you like it.

11

11.  Next reduce this with a paper towel and some water…  you will wipe part of it away, leaving it as more of a shadow than a bold statement…

12

12.  Dry.

13.  Using your ink and your stamps, add your sentiment.

14

14.  All that is left is to add some bright swirls using your liquid acrylic ink and you are all set and done!

17

Here are some final images…

18

final for blog hop

Now, for more inspiration, be sure to visit our other blog hoppers:

Stencil Girl Talk

Kirsten Reed

and

Maria McGuire

umwow swap with hazel & ruby…

$
0
0

I love getting to play and create for a living – it truly reminds me how blessed I am.

Getting to create this project made me even more happy because I got to create, not only with the fabulousness that Hazel & Ruby provides, but I got to use some fun products from UmWow too!

um wow hazel and ruby swap final 2

Here’s what you will need:

umwow with hazel and ruby 1

How to put it together:

1.  Paint the base of the frame white so that when you add the tissue paper you get a good result.

um wow painting pieces for hazel and ruby swap

2.  Paint the rest of the UmWow pieces and let them dry.

um wow pieces drying

3.  Decoupage on a single sheet of the Hazel & Ruby tissue paper.  Let that dry completely.  Trim off any excess.

um wow swap decoupaging on hazel and ruby paper

um wow swap trimming paper edges of hazel and ruby paper

4.  Add glitter to arrow and let that dry.

5.  Begin layering pieces.

um wow assembling pieces

6.  Use pop dots on the photo to add extra dimension and depth.

um wow adding photo

7.  Finish adding additional pieces over the photo to complete the project!

um wow final assembly

Now you can display this lovely little piece anywhere in the house!

um wow hazel and ruby swap final 1


Holy Discount Batman!!!! CreativeLive!!!!

$
0
0

Hi all!

I just got an email from CreativeLive with a HUGE (UUUGGGEEEE) discount for all of you!  This deal is for my friends, family, and followers – my personal VIP’s!

By using my VIP code at checkout, you can save 50% on any classes that you purchase between now and July 9th!  This is a massive discount!

Here’s the code to use: VIPStHamen

CreativeLive has a massive library to choose from beyond just my classes – they have classes on how to Podcast, business strategies for creatives, photography, and so much more!

I hope you take advantage of this great offer before time runs out!

Tropical Watercolor Card

$
0
0

Sometimes it is fun to just create a quick card that it is easy to make, but also cute and seasonally appropriate!  This is one of those cards.

Having moved to Wisconsin from Illinois so many years ago, we have scattered friends and family between the two states, as well as far beyond.  I enjoy having a stash of cards that I can use to send out to say hello to them when I am homesick or just want to let them know that I am thinking about them.  This card is so summery and quick to make that I have several on-hand right now!

Here are the supplies you will need to get started:

Putting it all together!

  1. Start by cutting your cardstock down to create a card that is 8.5 x 5.5, folding it in half and putting it to the side.
  2. Next, put your stamps onto your stamp platform and use your aqua flow pens to begin adding color.  You will need to do this 2-3 times to create the watercolor look you are going for.

3.  Using washi tape to hold the die cut in place, begin cutting out your flowers.

4.  Next you are going to grab your brush script pens and begin adding the final details to the flowers.

5.  Using your floral crafters tools, add dimension to your finished flowers and set them to the side.

6.  Using your aqua flow pens, add some green to some white cardstock and then dry it completely.  Go in and then add some blue.

7.  Using a circle die, cut out some of the area that you painted that you like the best.  Tape it down if you want to make sure to get a specific portion.

8.  Grab the “hello” stamp and stays on ink.  Stamp the sentiment onto the circle.

9.  Using your adhesive, assemble your card.

10. Using your Nuvo drops, add a few drops for dimension and let them dry.

All that is left to do is to put it in an envelope and pop it into the mail!


Latest Images